Documentation Index
Fetch the complete documentation index at: https://domoinc-arun-raj-connectors-domo-480814-upadate-new-checkbo.mintlify.app/llms.txt
Use this file to discover all available pages before exploring further.
Intro
The Domo Snowflake KeyPair Partition makes it easy to bring all your data from your Snowflake data warehouse into Domo based on the number of past days provided. If you are already using Snowflake as a data warehousing solution, this connector helps you use Domo in conjunction with it to get the most from your data. To use this connector, you must have your Snowflake account name (domain) and the username and private key for your Snowflake account. Use Domo’s Snowflake KeyPair Partition connector to maximize your cloud data strategy by connecting your data to Domo and making it instantly accessible to everyone in your company.Once your Snowflake data is in Domo, you can combine it with all your other Domo data to get a centralized view of your most mission-critical data.
Prerequisites
To connect to a Snowflake database and create a DataSet, you must have the following:- The full name of your account (provided by Snowflake). This is the portion of your Snowflake URL immediately following https://.
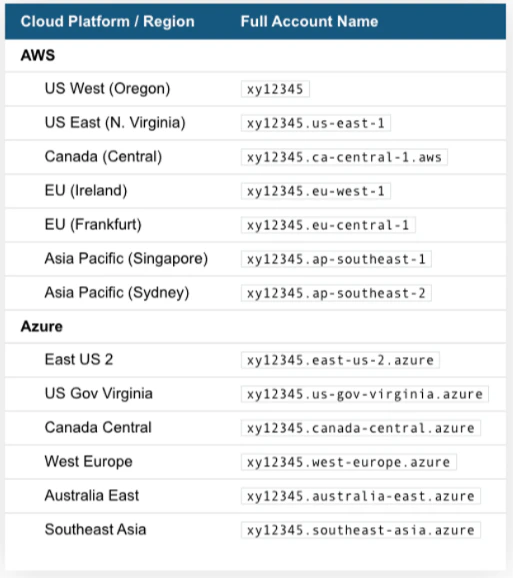
Note that your full account name may include additional segments that identify the region and cloud platform where your account is hosted. For US West Region account_name and All other regions account_name.region_id. The following table provides account name examples by cloud platform/region. For each row, it assumes your account name is “xy12345.”
- The username used to connect to your Snowflake host.
- The private key.
- The passphrase. If you create an encrypted private key, then OpenSSL prompts for a passphrase used to encrypt the private key file.
- Your role name.
Configuring the public/private key pair
To configure the public/private key pair, follow these steps:-
From the command line in a terminal window, generate a private key.
You can generate either an encrypted version of the private key or an unencrypted version of the private key.-
To generate an unencrypted version, use the following command:
$ openssl genrsa -out rsa_key.pem 2048 -
To generate an encrypted version, use the following command:
$ openssl genrsa 2048 | openssl pkcs8 -topk8 -inform PEM -out rsa_key.p8It is typically safer to generate an encrypted version. If you use the second command to encrypt the private key, then OpenSSL prompts for a passphrase used to encrypt the private key file. We recommend using a strong passphrase to protect the private key. Record this passphrase in a secure location. You will input it when connecting to Snowflake. Note that the passphrase is only used for protecting the private key and will never be sent to Snowflake. The following is a sample PEM private key:-----BEGIN ENCRYPTED PRIVATE KEY----- MIIE6TAbBgkqhkiG9w0BBQMwDgQILYPyCppzOwECAggABIIEyLiGSpeeGSe3xHP1 wHLjfCYycUPennlX2bd8yX8xOxGSGfvB+99+PmSlex0FmY9ov1J8H1H9Y3lMWXbL ... -----END ENCRYPTED PRIVATE KEY-----
-
To generate an unencrypted version, use the following command:
-
From the command line, generate the public key by referencing the private key. Assuming the private key is encrypted and contained in the file named “rsa_key.p8”, use the following command:
$ openssl rsa -in rsa_key.p8 -pubout -out rsa_key.pubThe following is a sample PEM public key:-----BEGIN PUBLIC KEY----- MIIBIjANBgkqhkiG9w0BAQEFAAOCAQ8AMIIBCgKCAQEAy+Fw2qv4Roud3l6tjPH4 zxybHjmZ5rhtCz9jppCV8UTWvEXxa88IGRIHbJ/PwKW/mR8LXdfI7l/9vCMXX4mk ... -----END PUBLIC KEY----- - Copy the public and private key files to a local directory for storage. Record the path to the files. Note that the private key is stored using the PKCS#8 (Public Key Cryptography Standards) format and is encrypted using the passphrase you specified in the previous step; however, the file should still be protected from unauthorized access using the file permission mechanism provided by your operating system. It is your responsibility to secure the file when it is not being used.
-
Assign the public key to the Snowflake user using ALTER USER. For example:
alter user jsmith set rsa_public_key='MIIBIjANBgkqh...';Notes:- Only security administrators (i.e. users with the SECURITYADMIN role) or higher can alter a user.
- Exclude the public key header and footer in the SQL statement.
- Verify the user’s public key fingerprint using DESCRIBE USER:
Property | Value | Default | Description |
|---|---|---|---|
Name | JSMITH | null | Name |
RSA_PUBLIC_KEY_FP | SHA256:nvnONUsfiuycCLMXIEWG4eTp4FjhVUZQUQbNpbSHXiA= | null | Fingerprint of user’s RSA public key. |
RSA_PUBLIC_KEY_2_FP | null | null | Fingerprint of user’s second RSA public key. |
- Update the security parameters:
-
<path>specifies the local path to the private key file you created. - Update the session parameters:
-
<user>specifies your Snowflake login name. -
<account>specifies the name of your account (provided by Snowflake). -
The sample code is as follows:
Key Rotation
Snowflake supports multiple active keys to allow for uninterrupted rotation. Rotate and replace your public and private keys based on the expiration schedule you follow internally. Currently, you can use the RSA_PUBLIC_KEY and RSA_PUBLIC_KEY_2 parameters for ALTER USER to associate up to 2 public keys with a single user. To rotate your keys,-
Complete the steps in Using Key Pair Authentication to…
- Generate a new private and public key set.
-
Assign the public key to the user. Set the public key value to either RSA_PUBLIC_KEY or RSA_PUBLIC_KEY_2 (whichever key value is not currently in use).
For example:alter user jsmith set rsa_public_key_2='JERUEHtcve...';
-
Update the code to connect to Snowflake. Specify the new private key.
Snowflake verifies the correct active public key for authentication based on the private key submitted with your connection information. -
Remove the old public key from the user profile. For example:
alter user jsmith unset rsa_public_key;
Connecting to Your Snowflake Account
This section enumerates the options in the Credentials and Details panes in the Snowflake KeyPair Partition Connector page. The components of the other panes in this page, Scheduling and Name & Describe Your DataSet, are universal across most connector types and are discussed in greater length in Adding a DataSet Using a Data Connector.Credentials Pane
This pane contains fields for entering credentials to your Snowflake account. The following table describes what is needed for each field:Field | Description |
|---|---|
Account Name | Enter the full name of your account (provided by Snowflake.) For US West Region account_name and All other regions account_name.region_id |
Username | Enter the username used to connect to your Snowflake host. |
Private Key | Enter the private key. |
Passphrase | If you create an encrypted private key, then OpenSSL prompts for a passphrase used to encrypt the private key file. Enter that passphrase here. |
Role | Enter the name for your role. |
Details Pane
This pane contains a primary Reports menu, along with various other menus which may or may not appear depending on the report type you select.Menu | Description |
|---|---|
How would you like to import data into Domo? | Select how you want to import your data. The following methods are available: - Standard Update (Replace/Append) - Use Partition - Use Upsert |
How would you like to build your Query? | |
Warehouses | Select the warehouse containing the data you want to retrieve. The list populates with all warehouses you have access to based on your credentials. |
Databases | Select the database containing the data you want to retrieve. The list populates with all databases you have access to based on your credentials. |
Schemas | Select the database schema containing the data you want to retrieve. The list populates with all schemas you have access to based on your credentials. |
Database Objects | Choose a database object. |
Tables | Select the database table you want to retrieve. |
Table Column Names | Select the table columns that you want to include in your report. |
Table Query Helper | A query is generated based on the selected fields. |
Views | Select the view. |
View Column Names | Select the view columns that you want to include in your report. |
View Query Helper | A query is generated based on the selected fields. |
Partition Criteria | Select whether you want to partition your data using the date keys, non-date keys, or a meta query. |
Partition Column Name | Select the partition column name. Only date fields will be displayed. |
Partition Support Format | Select the partition format. |
Partition Non Date Key Column Name | Select a non-date key column name to partition the data. All the fields, excluding Date fields, will be displayed. |
Query | Enter the query to execute. The query format must be like: select * from “databaseName”.“schemaName”.“tableName"" |
Partition Query to determine partition tags | Enter the partition meta query to determine the distinct partition tags(or keys). The column containing the Date data is your partition column. Example: SELECT DISTINCT(DATE_COLUMN_NAME) FROM TABLENAME |
Past Days | Enter the number of past days for which you want to fetch the data. Value can be X, where X is a positive integer. For example: 30. |
Past Years | Enter the number of past years for which you want to fetch the data. Value can be X, where X is a positive integer. For example: 30. |
Future Years | Enter the number of future years for which you want to fetch the data. Value can be X, where X is a positive integer. For example: 30. |
Past Months | Enter the number of past months for which you want to fetch the data. Value can be X, where X is a positive integer. For example: 30. |
Future Months | Enter the number of future months for which you want to fetch the data. Value can be X, where X is a positive integer. For example: 30. |
Data Format | Select/enter the proper date format according to the date format present in the partition column. By default, yyyy-MM-dd will be used. |
Custom Date Format | Enter the custom date format. |
Upsert Key Column(s) | Enter the upsert key column name or a comma-separated list of upsert key column names. Required only when the Update method is Merge. |
Query Tag | Optional parameter that can be used to tag connector SQL executions in Snowflake as a Query Tag. |
Other Panes
For information about the remaining sections of the Connector interface, including how to configure scheduling, retry, and update options, see Adding a DataSet Using a Data Connector.FAQs
Are there any API limits I should be aware of?
Are there any API limits I should be aware of?
How frequently will my data update?
How frequently will my data update?
What should I be aware of while writing a query?
What should I be aware of while writing a query?
Why can't I connect to my Snowflake database? Do I need to whitelist any IP addresses?
Why can't I connect to my Snowflake database? Do I need to whitelist any IP addresses?
Troubleshooting
- Make sure your authentication remains valid.
- Review the configuration to make sure that all required items have been selected.
- Review the Connector history for error messages.
- In rare cases, you may be requesting too much information and reaching API limitations or timeouts. If this is the case, you can review the history of the Connector run to see the error message and duration. If this is the case, you can reduce the number of accounts that are being pulled, choose a smaller number of metrics for the report that you are pulling, or reduce the timeframe that you are trying to pull.